
How (and why) you need to shoot tethered

Photo © Tether Tools
Shooting 'tethered' can seem like a giant leap for an amateur photographer. The concept may be daunting, because it is an inherently different way of approaching your photography.
Once you get past the psychological intimidation it is surprisingly easy to implement, and you will end up wondering how you ever did without it.The large majority of professional food photographers shoot tethered, and with good reason.
So what exactly is shooting tethered?
To be 'tethered' literally means to be tied, and in this case, tethering means 'tying' your camera to a computer via a tether cable. Once connected, you are able to control your camera from the computer and view your shots full-screen, in real time. Surprisingly for many, the software you need to 'drive' this connection usually comes as a free inclusion with your SLR camera on that CD that nobody ever opens! Even if you don't have a CD there are a multitude of softwares available to 'power' your camera from the computer, including some you might already have - like Lightroom, which has a built-in tethering function. Currently I use the Canon included software EOS Utility 3 but I am also currently trialling Phase One Capture One, which is the top choice of a large proportion of the best commercial photographers.
Why do you want to shoot tethered?
Tethering is particularly useful for food, product, and still life photography. By nature, this genre of photography leans heavily towards close-up framing. When you are viewing a close-up scene solely via a viewfinder, or the back-of-camera screen display, you don't have a clear perception of focus. There is nothing more disappointing than thinking you have captured rock-star images, only to view them full-screen and discover that your area of focus has been too small (or too large) or that the focus point was misplaced. Shooting tethered removes that uncertainty.

Photo © Tether Tools
Another beautiful aspect of shooting tethered — which is particularly relevant when you're in the creative zone, working on a multi-prop layout — is the ability to truly see the result of tweaking and repositioning of props instantly, in real time. The ability to 'see' the framed image as you micro-edit your scene, means you can be 100% sure you are satisfied with the result. It’s hard to achieve this objective perspective via a viewfinder. Once the camera has been set in position, and the lighting defined, shooting tethered means that you can focus all your attention on creativity and the camera can largely be ignored — as simply a tool to facilitate your creative expression.
Tethering is also a revelation for clients. I am very aware when I start working with a client for the first time, that they have 'the fear'. The fear usually comes from fruitless interactions with the copious number of 'photographers' in the marketplace who have bought a fancy camera and suddenly decided to sell themselves as professionals, without training or experience. They slap together a relatively convincing portfolio thanks to the photoshop-crutch, and then deceive their hapless client with a misguided conception that they are much more capable than they really are. Shooting tethered means that you remove the anxious wait for the client and the uncertainty of whether they have invested wisely. The relief that washes over the face of a client when they see the first shot pop up onscreen is gratifying, and sets a great tone for the rest of the shoot.
What do you need to shoot tethered?
An SLR camera that offers a tether cable connection point,
A tether cable,
A computer,
Software to drive the connection from the computer.
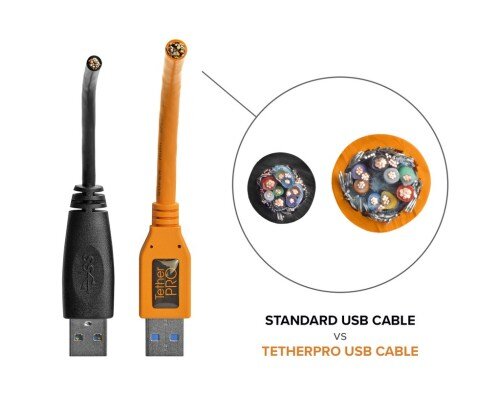
Photo © Tether Tools
The tether cable is possibly the trickiest part of the kit because you have to make sure that it has the right connection at either end to suit your camera and your computer. For some unknown reason each time a camera or computer is upgraded they seem to change the connection type, so I have several tether cables to suit different cameras and computers. You also need to make sure that you're using a USB 3 connection point (as opposed to USB 2) on your computer with the more recent models of camera, or the connection will be ropey at best, or even sometimes lost altogether. Theoretically you could use a standard, cheap black mini-usb cable to connect, and indeed your camera will often come supplied with one of these cables. However, a company called Tether Tools offers the industry-standard cables for tethering, that are distinguished by their striking orange colour. These cables are comparatively quite expensive, however they are designed specifically for tethering and perform at the highest speed possible, which is preferable when you are dealing with large image files.
What are the drawbacks to tethering?
You can probably tell that I am a strong advocate of shooting tethered. However there are some considerations to keep in mind. Shooting tethered can drain the battery of the camera and computer more quickly, so if you’re shooting on location, make sure to have power points and/or extra batteries available. Also as I have mentioned before if you don't invest in a proper cable, or your other equipment isn’t up to spec, you could experience a lag on every shot, which isn’t a viable work process — so make sure you have trialled your set-up before attempting this approach professionally.
The whole experience of being ‘tethered’/tied from camera to computer can frustrate a photographer that enjoys bouncing around the full area of a room, jumping from one angle to another. This is a more restrained approach to framing. Arguably a more disciplined approach can result in better results because, along with a tripod it forces you to define your framing and then work the composition within the frame. Having said that, you are not restricted to being on-tripod - so as long as you select a nice loooong cable (pay those extra $s, they are worth it) and you become proficient at rope-skipping (cable-jumping) with a small amount of practise you can still move around as you are accustomed to.
Working tethered is not for all genres - it has a definite ‘place’. A studio based setting is ideal and almost all professional in food, product and fashion photography will shoot tethered. Conversely it is almost unheard of in more spontaneous settings, e.g. sports photography, weddings, outdoor pursuits etc.

Photo © Tether Tools
My biggest challenge with shooting tethered has been damaging cables. Once you have become accustomed to shooting tethered it’s really unviable to go back to the tedious process of removing the data card and putting it in a card reader for every shot. You lose an inordinate amount of time. However, unfortunately it is very easy to damage a cable, particularly when you’re in the thick of a high-pressure shoot and your unco-feet are well known for stomping where they shouldn’t (#guilty!). There is no professional camera shop near to where I live so I’m looking at about a week to get my hands on a new cable, so I’ve always got a brand new cable on-hand, just in case. Tether Tools have also got some handy accessories to protect against cable damage, including a variety of jerk-stoppers and cleverly designed cable plugs.
Download a FREE chapter of my book 'The Ultimate Guide to Natural Light for Food Photography' by adding your details here:

Having said all that, wireless tethering is now a thing! I haven’t yet had the opportunity to try the relatively new Tether Tools Air Direct Wireless Tethering System but I’m excited to give it a try. I had initially dismissed it as an option because I had seen the transmitter attached to the hot shoe, which I already use for my studio lighting trigger. I’ve recently discovered that apparently there is another fitting that overcomes this obstacle, so I can’t wait to give it a test drive.

Photo © Tether Tools
After a quick re-read I realise that I might be coming across a bit like a Tether Tools commercial, but I can honestly say that they have had zero involvement in creating this article (other than asking very nicely if I could use their photos). It’s a bit like writing about Photoshop — some tools have become such an industry-standard that they are an assumed part of your kit — while there are competitors, there is definitely a #1 choice.
Conclusion
Composition, work-flow and client satisfaction improved dramatically by introducing a tethering system into my everyday shoot process and I will never look back. Tethering only takes a small initial financial investment and a few hours of education to result in a significant step forward in your professional career.
Want to know THE best lighting angle for food photography that works every time? Download my free cheat sheet by entering your details below:

You might also like:


Hi I'm Fran, a professional photographer and designer based on the Gold Coast in Australia. I’m a lifelong creative, passionate about producing drool-worthy images that provoke emotion and make you hungry! My obsession is teaching others how to achieve the satisfaction of realising their creative vision. I also love to produce high quality visual books (especially cook books) for my clients.