
Why I have Lego and makeup sponges in my food photography styling kit
Today is your lucky day! Not only am I going to let you in on my 'secret' for having Lego and makeup sponges in my styling kit, I’m also going to share details of my entire food styling 'bag of tricks'. This could save you hours of ‘wishing you had thought of it earlier' moments.
Photography is one of those disciplines that after an initial period of study — unless you are lucky enough to score a full-time assistant role — you’re pretty much on your own in terms of developing techniques and a kit to suit your job. As a result, problem-solving and ‘trial and error’ are the (hair-pulling) catalyst for discovering useful tips and tricks. It can be a long journey pushing yourself up the hill to becoming a competent food photographer.
Some elements of my styling kit might be a bit unconventional, but they work for me, and chances are they might work for you too. To be honest, I may be the ground-breaker with regard to using Lego as part of my kit. In fact, so many of my students are using Lego now, that I'm sure it’s only a matter of time before some ultra-famous food photographer busts out with the same suggestion!
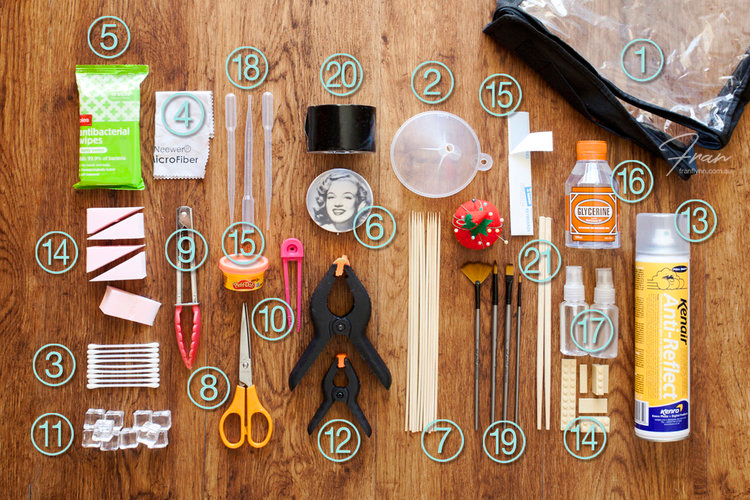
1 Kit Bag
This little transparent zip-closing bag is perfect for finding exactly what I need with ease. Funnily enough, it actually started life as packaging for a queen-size fitted-sheet! I couldn't have wished for a better bag. It's perfect in size, shape and closure.
2 Funnel
When you are pouring liquids into a vessel, you don’t want that liquid splashing up onto the inside surface of the vessel. Otherwise, you would spend a lot of time cleaning away drips with cotton buds. A funnel will direct the liquid into the centre of the vessel, et voila, no splashes!
3 Cotton buds
These are the ultimate for cleaning up all manner of drips and unwanted dots, as well as for cleaning tiny areas that would otherwise be unreachable. I have recently become aware of how environmentally unsound cotton buds are. I have promised myself that the next packet (and every packet after that) will be biodegradable.
4 Micro-fibre cloth
Fingerprints show up like shining beacons in closeup food photography shots. A matt black plate is a classic example. The tiniest bit of oil in your fingertips will also turn a spotless glass into a fingerprint mess. Tiny bits of lint, almost invisible to the naked eye can become a centrepiece in a closeup shot. Therefore, a micro-fibre cloth is a must-have item.
Gloves (not pictured)
If you had thought of using these beforehand you wouldn’t have needed the cloth above! I always think of putting gloves on when it’s too late. It's still great to have them on-hand for those shining moments when you do remember them. (And for after you’ve spent 10 minutes with the micro-fibre cloth).
5 Wet wipes
Useful for everything! Food photography and mess go hand-in-hand. For some reason that I can’t explain, sauce often seems to get on the walls and floor. Plus between shots, backgrounds usually need a wipe-down.
6 Makeup mirror
Technically this is actually a photographic as opposed to a styling prop. But, it lives with my styling kit, so it’s earned its spot.
There is often one little area that needs a touch of extra light in a shot. A little makeup mirror like this is a perfect reflector. It will stand alone when left open and it creates a small spotlight exactly where you would like it to point.
Download a FREE chapter of my ebook 'The Ultimate Guide to Natural Light for Food Photography' by adding your details here:

7 Skewers
Skewers are essential for burger stacks, sandwich stacks, donut stacks, and every other kind of balancing act. They will hold the most wayward food in position and can be chopped to any length.
8 Scissors
I seem to be in a continual flow of losing and inheriting scissors. I can't think of one shoot that I've participated in that we didn't need scissors. They are the one thing that I always leave behind, or end up with someone else's set in my bag.
9 Plastic tipped crocs
I love these plastic tipped crocs because they can pick things up gently, without bruising or dinging. They are perfect for loading up things like salads leaves or tweaking the position of already placed items.
10 Tweezers
Chefs’ tweezers, garnish tweezers, food tweezers, culinary tweezers - however you'd like to refer to them, they are looong tweezers. Much longer than your average eyebrow tweezers and perfect for re-positioning micro herbs, edible flowers and other delicate items.
Fish-boning tweezers are also long, but they have a less precise head.
My chefs' tweezers recently did a disappearing act, and I didn't manage to replace them in time for this shot. Instead, you are seeing a pair of clunky, plastic, non-chefs' tweezers sitting in their place. (Very unhelpful I know, sorry!)
11 Fake ice
Acrylic ice cubes are fantastic for faking a cold drink. It can be hard to photograph a chilled drink. Condensation won’t always appear how and when you want it to. Drips will run down the glass and pool on the surface below. Using acrylic ice cubes in a room temperature drink removes the issues associated with cold temperatures. Then you can add fake condensation, that will stay exactly where you put it, using glycerine (see below).
12 Clamps
I use clamps for everything… My clamps possibly aren’t the ideal type. I know that A-clamps are more often used by photographers — and there are times that I wish I had a few — but I find that these clamps hold everything from backdrops on my circular poles to fabrics onto flat boards. Their versatility is what I enjoy. I purchased a pack of around 30 clamps of varying sizes in one pack at my local DIY store. A-clamps are on my shopping list.
13 Dulling spray
This is a recent addition to my kit. I read about it on an American food stylist’s blog. Reflections are often a challenge in food photography. Reflections on background surfaces, reflections on glasses, cups and plateware… they’re everywhere!
A polarising filter will help in a lot of cases, but sometimes they have little or no effect. I was sceptical about whether dulling spray could be useful, but I’m happy to report that my first couple of uses have been very fruitful. Just make sure to wash whatever you’ve sprayed afterwards.

14 Lego & makeup sponges
One of the trickiest things to do when you are producing food images is convincing small items to sit at exactly the right angle.
Lego is particularly effective for this task because it comes in such a variety of sizes and thicknesses. I like to use a neutral tone, so if you happen to see a tiny bit of Lego peeping out, it’s pretty easy to colour it to match the background. You can quickly and easily form a size and shape that suits the angle you’re trying to achieve.
In the picture above, the napkin was creating an imbalance under the plate. You can see that I used a very slim piece of Lego on the opposite side, to even it up.
The individual donuts are positioned on forward facing angles, using a variety of different Lego creations.
Triangular wedge-shaped makeup sponges are very useful for positioning and angling props and food items. They can be cut into smaller pieces when required.
I also often use my lens caps as a positioning tool. They seem to be often the right thickness for tilting different items a fraction towards or away from the camera.
15 Bluetack and Playdoh
My second raid on my son’s toy box is usually for a tub of Playdoh. The malleability is very helpful for creating shapes to angle and position items.
There are some situations that makeup-wedges or Lego can be very successful and others that might warrant a blob of Playdoh.
Bluetak (or Whitetak) is great for holding tiny things in position. For example, holding a spoon on a certain angle, or a straw sitting against a particular side of a glass, etc.
Sticky-back Velcro Dots (not pictured)
This is another item that is possibly more of a photography prop than a styling prop, but it's worth a mention. I've found these particularly useful for sticking wireless triggers to the side of strobe lights. This avoids putting a strain on the tiny cable. It has increased the lifespan of my trigger units significantly. I've found many other styling uses for these little dots, but this technique is definitely the most effective of all.
16 Glycerine
Glycerine is colourless and odourless, with a consistency somewhere between a liquid and solid. It has a particularly high viscosity which means that it will hold its shape for a long time and it doesn’t evaporate quickly. It is perfect for any time you would like droplets, e.g. droplets of water on salad, or droplets of condensation on a glass. I’ve even used it to spruce up some dry looking steak. It adds sparkle and light wherever it’s sprayed.
17 Spray bottles
Spray bottles are another ‘use-it-every-shoot’ accessory. One for water, one for glycerine and a spare.
18 Pipettes
Harking back to school science lab days, pipettes are super useful for all things sauce. They will suck up a sauce from places that you don’t want it, and delicately position dots and stripes of sauce wherever you do.

19 Artist brushes
My favourite brush is the little fan brush – it’s great for positioning crumbs, or sweeping them out of the way. Other brushes can be used for painting a bit of juice onto meat just before taking the shot, or flicking away a stray dot of pepper… endless uses.
20 Photographers gaffer tape
This tape is not cheap and is also technically more of a photography than styling prop, but it lives in my styling kit nonetheless. In comparison to duct tape it can seem outrageously expensive however, it has properties that make it really special. At the same time as being really strong and sticky, photographers gaffer tape is also repositionable and removes (usually!) without leaving a sticky residue. Photographers gaffer tape is actually a heavy adhesive cloth rather than sticky back plastic like duct tape. It is your ‘do everything’ tape. It can temporarily (or long-lastingly) fix many things, from cables to dropped props. It will hold things in place, backgrounds, cables, or even a whole light on a closed tripod in a tight space! It is also very useful for fashioning creative light modelling elements like shaping the area of your softbox or fashioning a small snoot etc. It’s also affectionately known as a photographers' 'best friend’.
21 Chopsticks
Last but not least chopsticks. I’ve found that we’ve sometimes wanted a couple of chopsticks when we didn’t expect that we might want some chopsticks. So I always keep a pack in my kit – just in case.
Have you got anything unusual in your styling kit? I’ve love to receive some innovative recommendations that I haven’t come across yet.
Want to know THE best lighting angle for food photography that works every time? Download my free cheat sheet by entering your details below:

You might also like:


Hi I'm Fran, a professional photographer and designer based on the Gold Coast in Australia. I’m a lifelong creative, passionate about producing drool-worthy images that provoke emotion and communicate deliciousness. My obsession is teaching others how to achieve the satisfaction of realising their creative vision too. I also love to produce high quality visual books (especially cook books) for my clients.